Showing posts with label paper mache. Show all posts

Tuesday, May 14, 2013

BENEATH THE SURFACE - Teen Summer Reading Program 2013

I never quite know how my ideas will turn out.  But, I'll have to say this one turned out exactly how I imagined it.

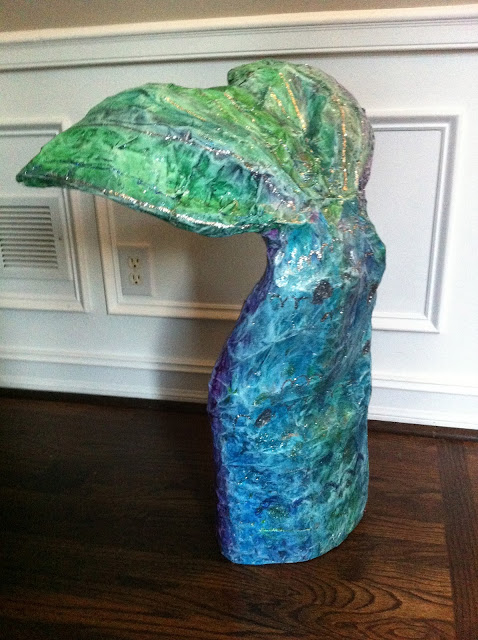
Our Summer Reading Program at the library starts the end of May.  The theme for the Teen Program is "BENEATH THE SURFACE".  I thought it would be cool to make a mermaid tail looking like it was diving into the water.  It's makes you wonder what she looks like and what IS beneath the surface.

I decided to make my mermaid's tail out of paper mache.


I've found that the easiest thing to use to make paper mache is wallpaper paste and old newspapers.  I bought this paste from Home Depot about 6 years ago and it's still going strong.  It cost about $5. and I imagine if you were to make your own paper mache out of flour and water, you'd have to buy about $5. worth of flour anyway.  It's easy to clean and no mold.


I started by forming the shape I wanted out of chicken wire.  (from Home Depot as well)  I wired the edges together, bunched it together at the top just below where I wanted the fin to start and formed it in the shape I wanted.


Then, I started tearing paper and dipping into the wallpaper paste.  Cover the entire surface with the paper mache and be sure to smooth down the edges.  To quicken the drying process, I sometimes use a hair dryer.


Mermaid tail completely covered with the newspaper paper mache.


I next use Gesso (from Dick Blick) to paint over the newsprint.  The gesso will keep the newsprint from bleeding through your top coat of paint.  It is not mandatory, it just gives you a nice base to start painting on.


Here are the colors I pulled out from my watercolors and acrylics.  I also found this package of glitter from the Dollar Store.  I knew it would come in handy sometime.


And here it is after I completed painting the tail.  It has glitter sprinkled on it randomly and just glistens.  I used mostly watercolor paint.  I rubbed slightly to blend the colors and when I did, I noticed that the outline of the chicken wire started to show through.  That was perfect, because it looks like scales.  Yea for surprises!!


I painted a little sign to  add to the top of the bookcases "Beneath the Surface" out of scrap cardboard.
I hope you'll try paper mache sometime.  It is so much fun and it is a very cost efficient way to make props for the library!


Tuesday, August 2, 2011

PAPER MACHE TUTORIAL


This is a paper mache piggy bank I made for a library display featuring novels about money.  Most of the materials I had at home.  I found the gold plastic coins and oversized paper money at Party City.


I started out with round balloons.  Tape them together using masking tape.  I only had painter's tape around.  I used toilet paper rolls for the legs and taped them in place.


I tear up newspapers in about 3-4" pieces and dip them into wallpaper paste.  Be sure to scrape most of the paster off of the paper before you apply to the form so it doesn't take too long to dry.  Sometimes I will dry with a hair dryer.  Keep applying pieces of paper mache all over the form.


Let the form dry between layers.  You will probably need to add 3 to 4 layers to make it sturdy.


I added a tail using a wire and wrapping newspaper around it.


The nose is made using part of a toilet paper roll.   I taped it on first, then added paper mache around it.


When the newspaper is completely dry, I paint the entire form with gesso.  This will seal the newspaper and serve as a base for your paint.


Now, start painting your precious little creature!


My finished display "MONEY MONEY MONEY" featuring all sorts of books about money.

Tuesday, May 18, 2010

CRITTERS FOR THE CHILDREN'S LIBRARY

What do you do with all of your recyclables? I've decided to make some paper mache figures for the Children's Library for the summer. The summer reading program theme is "Make a Splash" this year so I'm making a few of the more popular figures and putting them into a water theme. I think I'll put little floaties around Froggy's arms and some flippers on his feet. Below I gather my materials.............an old Tide container, toilet paper rolls, wallpaper paste, newspapers, masking tape, paper plates, etc.


I start by looking at the shapes of the materials and figuring out how to make Froggy out of a Tide container! I roll newspaper balls up for eyes, tape paper plates as lips, and tape the toilet paper rolls as arms.


I then tear newspaper up into small (somewhat) pieces and dip into the wallpaper paste. I start applying to the figure and keep adding newpaper balls where needed. The masking tape keeps things in place. It also helps to use a hair dryer to quickly dry the wet newspaper. Below, you can see his face developing.


Here he is so far with the first layer of paper mache applied. I will let him dry today and add arms and feet tomorrow. When he is dried, I will paint white gesso to completely cover the newspaper print and then paint with acrylics. I think these figures will add a touch of whimsy to the Children's area at the Woodstock Public Library. Come see us this summer and sign your kids up for the Summer Reading Program!