Saturday, September 3, 2011

ITTY BITTY BABY BOOTIES

On my needles.................

I started a pair of itty bitty socks for my niece, she's having twins.

A girl AND a boy.

The pattern is a basic sock pattern I found called North Country Cotton Baby Socks.  


I haven't knitted in a while and since the days are getting a little shorter

it's getting a little cooler outside

and college football starts today

I just felt like picking up some yarn and making these cuties.


They look large int he photos, but they are really just a little 

larger than my key.  They were so much fun to make

and I hope BABY "B" and his mom will love them!

Now on to a pink pair!


Thursday, September 1, 2011

BANNED BOOKS AT THE LIBRARY

I've been working on a new display for Banned Books Week at the library.  BBW takes place the last week of September but our display will be the entire month.  I wanted to highlight some of the banned books that most people take for granted.  Just think, if some people had their way..........you would not be able to read these books.  Can you imagine............not being able to read "Gone With the Wind", "To Kill a Mockingbird" or "Harry Potter"?  I got all of my information from the ALA (American Library Association) website.  I made color copies of book covers on my copier from books I own.


Our First Amendment gives us the freedom to choose what we want to read.  That's the point.........our CHOICE.  We may not want our children to read some books, we get to choose, thanks to our First Amendment!


I made very simple flames that represent the burning of books out of toilet paper rolls and construction paper.  I will place them between the banned books on display.


This is a close up of the library card generator I downloaded from the internet from blyberg.net.  I added the titles of books, authors and the reason the books were banned or challenged.


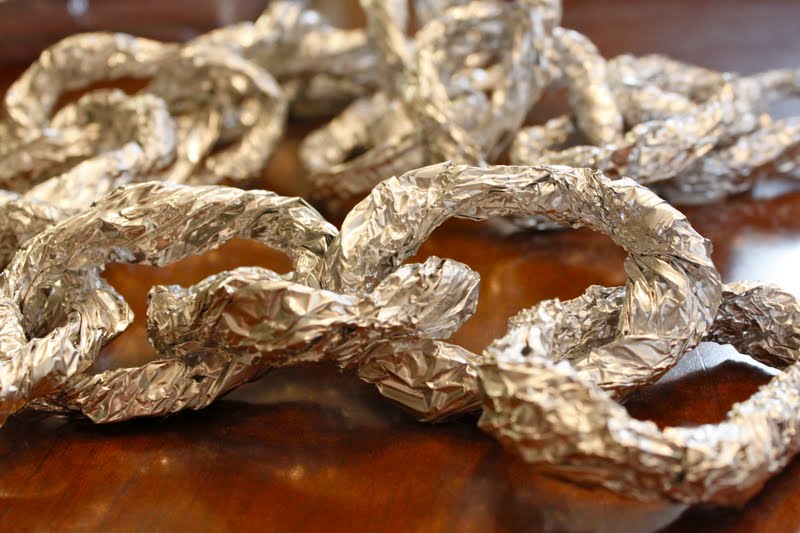
I also made a chain link out of aluminum foil that I plan to use in the Young Adult area around "banned" books.  Another quick, cheap and easy idea.........


Monday, August 29, 2011

COMFORT FOODS

CHICKEN POT PIES AND SOUR CREAM CINNAMON COFFEE CAKE


Saturday, August 20, 2011

HOMEMADE SOURDOUGH BREAD

It's been a long time since I've made homemade bread.  I remember making a batch of sourdough starter about 25 years ago.  I made sourdough pancakes and bread for a while.  A few years ago I bought another package of sourdough starter but when I mixed the packet, I left it in the garage too long and it turned into a stinky brown liquid.  I have had one package left in my pantry for a long time and decided to try it again, this time with better luck.........


This is the Goldrush Sourdough Starter Packet.


You start out by mixing warm water with the magic sourdough particles, flour and water.


I put a reminder on my frig  so I wouldn't forget to add to my starter.


This is what the started looks like after 24 hours.


And this is after 48 hours.  It is really pungent by this time.


Follow the directions and make your dough.


Let it rise


divide and conquer.


Here are the finished the loaves.  It took a long time to make but I'll have to say it was worth it in the end.  You just can't beat hot and fresh sourdough bread.


Tuesday, August 2, 2011

PAPER MACHE TUTORIAL


This is a paper mache piggy bank I made for a library display featuring novels about money.  Most of the materials I had at home.  I found the gold plastic coins and oversized paper money at Party City.


I started out with round balloons.  Tape them together using masking tape.  I only had painter's tape around.  I used toilet paper rolls for the legs and taped them in place.


I tear up newspapers in about 3-4" pieces and dip them into wallpaper paste.  Be sure to scrape most of the paster off of the paper before you apply to the form so it doesn't take too long to dry.  Sometimes I will dry with a hair dryer.  Keep applying pieces of paper mache all over the form.


Let the form dry between layers.  You will probably need to add 3 to 4 layers to make it sturdy.


I added a tail using a wire and wrapping newspaper around it.


The nose is made using part of a toilet paper roll.   I taped it on first, then added paper mache around it.


When the newspaper is completely dry, I paint the entire form with gesso.  This will seal the newspaper and serve as a base for your paint.


Now, start painting your precious little creature!


My finished display "MONEY MONEY MONEY" featuring all sorts of books about money.

Saturday, July 30, 2011

Jekyll Island Morning Glories


One rainy afternoon while in Jekyll I decided to start a little watercolor painting from a photo I had taken on the beach.  It was of a pink flower that looked like a morning glory, but I'm not sure of the correct name.  It was such a bright pink and just stood out from everything else on the beach.  I just sketched it from my computer and enjoyed painting while it rained outside.

JEKYLL ISLAND TEXTURES


Tuesday, July 19, 2011

SUMMER ZUCCHINI

My son brought me a huge zucchini from his garden the other day.  It reminded me how much I miss really fresh vegetables.  We had a large garden about 30 years ago in Greenville SC and had fresh vegetables all summer.  


I cut it open to make some zucchini bread.  It sparkled like little diamonds.


The recipe called for 3 cups of shredded zucchini.  I had just enough.


And here is the freshly baked Zucchini Bread.  I got the recipe from a 1982 cookbook that my mother in law gave me.  Here is the recipe if you want to make some for yourself.

makes 2 loaves......so you can share this yumminess!

3 large eggs
2 cups brown sugar (dark)
3 cups flour
1 teaspoon salt
1 teaspoon soda
1 tablespoon baking powder
1 tablespoon cinnamon
1/2 teaspoon cloves
1/2 teaspoon allspice
1 cup salad oil
3 cups zucchini, peeled and grated
1 1/2 cup nuts (I used walnuts)
2 teaspoon vanilla

Combine eggs and sugar in large mixing bowl.  Add salad oil.  Stir in dry ingredients which have been sifted together.  Add zucchini and nuts.  Stir in vanilla.  Pour into prepared pans and bake in preheated oven for 45 minutes to 1 hour or until browned.    Bake at 350 degrees.....


Here is my son about 28 years ago holding another huge zucchini in our garden.


Tuesday, July 12, 2011

THE AMY BUTLER WEEKENDER TRAVEL BAG

OK, I've had this Amy Butler Weekender Travel Bag pattern in my sewing room for a long time.  It seems to move around from my desk to cutting table to shelves to fabric shelf to hiding under my watercolor supplies, to my knitting stash and then to my bag of toilet paper rolls that I'm sure I'll use someday.  I keep thinking I REALLY SHOULD MAKE THIS BAG.  But it's just too intimidating.  I started reading blogs with pointers on the WEEKENDER.  I broke down, ordered some Amy Butler fabulous fabric and started cutting it out today.  Already, I love it.  I'm pretty sure I'll soon be saying I hate this, but for now I'm still in la-la land and can't wait to start on it tomorrow.  Stay tuned................


Sunday, July 10, 2011

AUBURN'S POISONED OAK TREES

I travelled to Auburn this weekend to help my daughter move into her new apartment.  We took a break and drove downtown.  I wanted to take a photo of Toomer's Corner and the oak trees that are rolled with toilet paper after every winning football game.  They were poisoned several months ago by a crazy U. of Alabama fan.  So far, they are still standing.  The oak tree on Magnolia was looking a little yellow to me and the one on College has lost a lot of leaves but they both had new leaves.  The specialists say now that they just may survive.


These signs were posted in front of the trees.


I was surprised to see so many people there doing the same thing I was.......taking pictures of the oak trees.  I thought it may be the last time that I'd see them.  You can see from this angle that they have lost several branches.


The roots are massive.  It would be such a shame if they died.